
Summary:
This article lays out the steps needed for setting up Continuous Deployment(CD) from a GitLab Repository to a Ubuntu server. You will need basic knowledge about servers and GitLab to keep up. For me personally, I was linking a simple Laravel web app repo to the deployment server using the following technology stack
- Ubuntu Server with SSH access
- Apache2
- MySQL for Database
- GitLab Repository
Briefly, I followed the below steps for a successful Continuous Deployment.
- Configuring SSH access to GitLab Repository from Ubuntu Server without password (using OpenSSH Private/Public Keys)
- This allows the server to pull changes when new commits are pushed
- Cloning GitLab repository or Adding Remote Repository
- Configuring SSH access to Ubuntu Server from GitLab Repository without password (using OpenSSH Private/Public Keys)
- This allows GitLab to access Ubuntu server and run commands
- Making the .gitlab-ci.yml to define Pipeline for CD. (Or steps for GitLab to follow when commits are pushed)
Background:
I normally work on small scale projects as a solo developer, so using Git extensively with Continuous-Integration/Continuous-Deployment (CI/CD) capabilities didn’t seem much beneficial in my workflow; Plus with no formal training or experience working in big teams, I never really got into the collaboration capabilities made available by Git.
Recently I started a project on which I had to collaborate, so I thought this was a good opportunity to get my feet wet on Continuous Deployment. The project was a simple Admin Panel for a mobile application and no tests were written. The main goal was automatic deployment to my server whenever a commit was pushed to my GitLab repository.
I did not require Testing, Continuous Integration or Docker Deployment. While there are many guides on how to do CI/CD with varying levels of feature implementation, I wanted a bare-bones solution with minimal complexity and time required. As a total newbie in GitLab CI/CD, with only basic knowledge of Linux, and most of the guides revolving around Docker deployments, I had some trouble figuring out how to implement Continuous Deployment.
So, this is an article for someone looking for a basic deployment configuration with GitLab with a Ubuntu Server, and for me as future reference.
GitLab Repository Access from Server using SSH
GitLab repository will be configured as such that it can be accessed via SSH without being prompted for a password. This way our server will be able to pull the latest changes from the repo via simple git pull command.
We will go through these steps
- Create or Find a Public/Private key pair
- Copy the public key to GitLab Repository
- Configure GitLab on Ubuntu Server to use the private key when accessing the GitLab Repository
Create or Find a Public/Private key pair:
For this we will SSH into the Ubuntu Server to find the already generated keys or make new ones.
Once connected to your server open the command line and go to the .ssh folder. The following command can be used.
cd ~/.sshOnce in the directory see if you have any key pairs available.
ls -aGenerally, you would be able to find two files there name “id_rsa.pub”(Public Key) and “id_rsa”(Private Key)
In case the key pairs were not found. Use the following command to generate SSH keys
ssh-keygen -t rsaWhen prompted for a passphrase, just press enter to keep it empty.
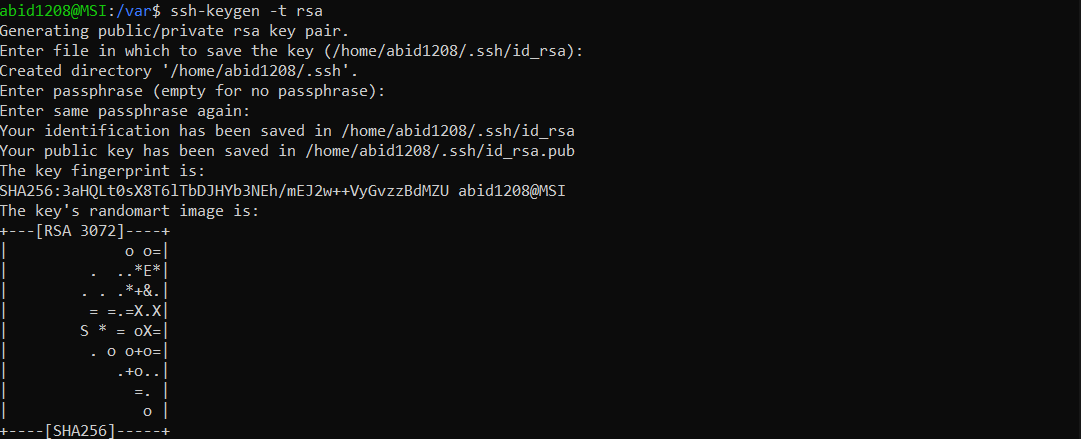
Afterwards, the key pairs will be available in the directory you specified during key creation.
Copy the public key to GitLab Repository
Now go to the directory where the keys were generated. Open the id_rsa.pub(Public Key) with any text editor and copy its content. It will look similar to this
ssh-rsa AAAAB3NzaC1yc2EAAAADAQABAAABgQDQt2SKv/H/SGHy1VgA8mfFG+0WdZexBO24AycNilAQEJkTPkvxkAq42/am4X9JZl/TjCvEUKCYXeays3fq1ZD6TIJeeOhOf0YqPsrQnyC98cFEM/f5v63oWp6cO8h+tynB7TZoT18ItwIOgWKvXO9GmUdUu7CrTAF8b2iC0r08RWxopYEQD4uWFy8iR9wmasdaWe8c/KyeO/GjqX+2+jmNIKe/p8sjnPqN+ArbKeYdI3nI5GdzbfUg7Po471m4cCcWNTeUpVPxrLcwWMjC85P3FPm4BzOX2l2LU7C9+Ln+MzJaTDWBjMb5u2zSesLyx1m91QNDo0Kf1f9pMasdasdaE84C//FkL0ZCiufEwmZjXRguBH+e/SQ/A+lM9bHu7HN14tqHL6xGGozObc5tXfbkuTeP0CAGbUT35yRPkckbxblf5wGN5eiQQIjvF6JbBP9bRwvHZUW2BbgmH4hG4HTTyXRj/UvN1EoEtccQZYqxG9pFb3o9OxC1kk= abid1208@MSILogin in to your GitLab account and go to your Repository. Navigate to Your-Project ⇾ Settings ⇾ Repository ⇾ Deploy keys.
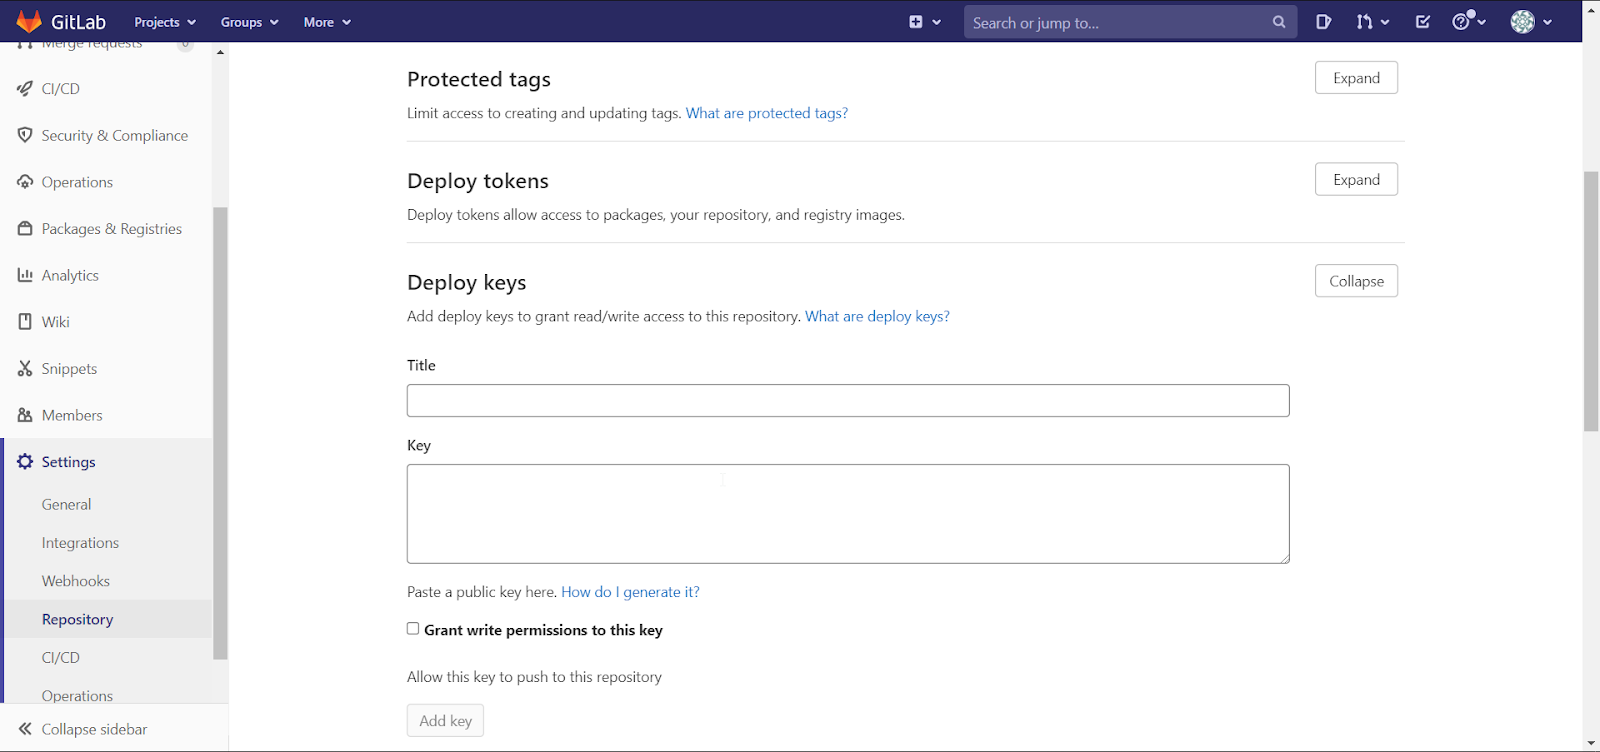
Give a Title to your key, it can be any text which you can later identify. Then paste the contents of id_rsa.pub in the Key field and save.
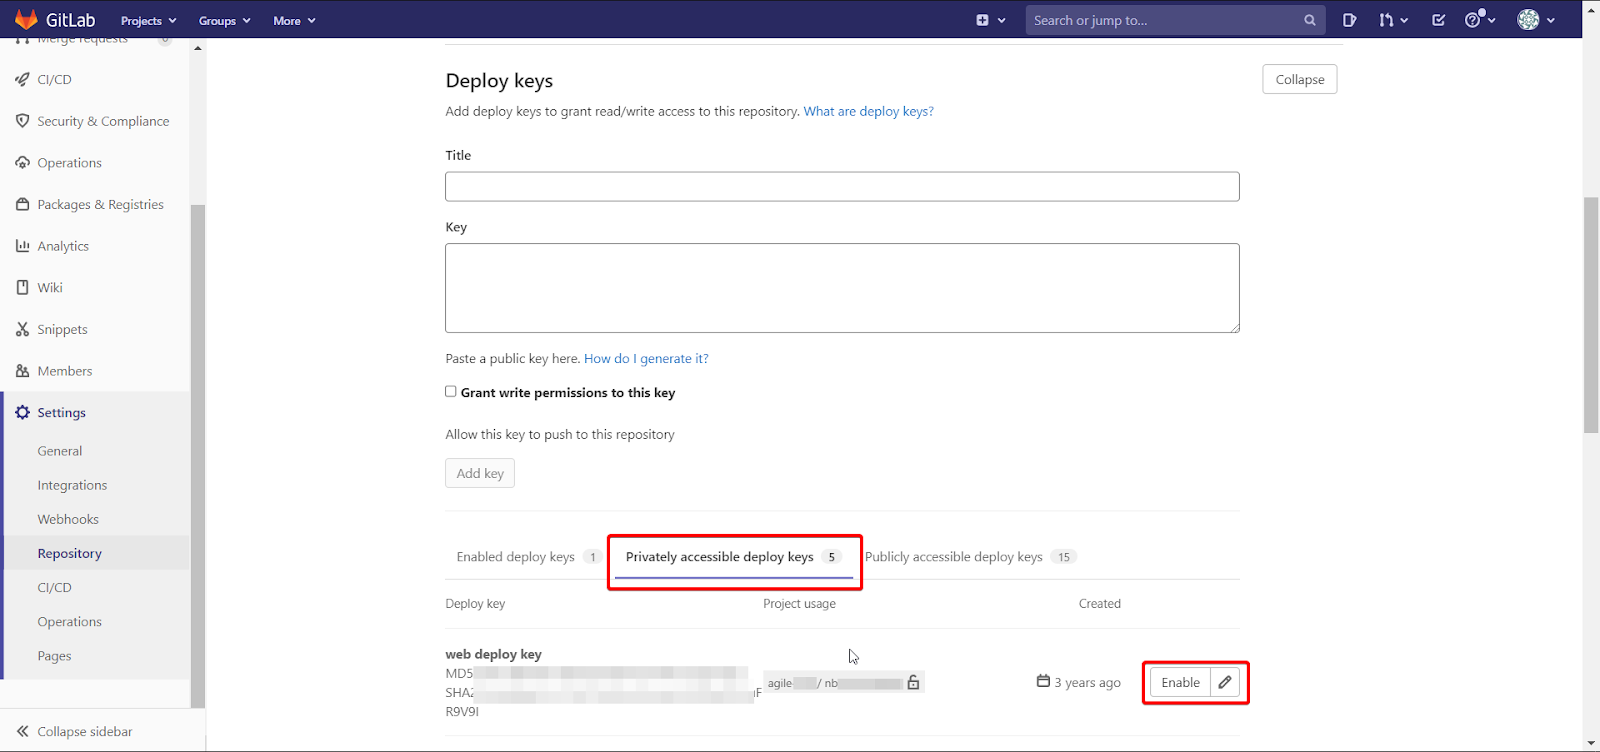
Note: In the case you will be deploying several web apps to the same server, and you have previously added the SSH key to that server for another repo; That key will be shown in “Privately accessible deploy keys” tab, and you can just “Enable” that key for this repository.
Configure GitLab on Ubuntu Server to use the private key when accessing the GitLab Repository
Next we need to configure our Ubuntu server to use the private key we created(or was already available) whenever we try to SSH to GitLab. To do this we need to ensure that ssh-agent is enabled by using the following command in the terminal
eval $(ssh-agent -s)Then we can add the private key to the SSH Registry by
# Add your private keyssh-add ~/.ssh/id_rsaBe sure to use the directory in which the key is placed instead of ‘~/.ssh’
We also need to save these settings in a configuration file. Usually OpenSSH clients have a config file in the ~/.ssh/ directory under the name of config. If this file is not available, you can just create it using
touch configin your .ssh directory.
Note: if your .ssh directory is under /home/user_name, you will need to create the config file there.
Open the config file and add the following lines to it via a text editor
#GitLab.com serverHost gitlab.comRSAAuthentication yes#Be sure to replace the ~/.ssh with the directory in which private key is storedIdentityFile ~/.ssh/id_rsaIn case you have private server for different projects you can use multiple key pairs and configure them to use separate keys
#GitLab.com serverHost gitlab.comRSAAuthentication yesIdentityFile ~/.ssh/config/private-key-name-for-project1#Private GitLab serverHost gitlab.privateserver.comRSAAuthentication yesIdentityFile ~/.ssh/config/private-key-name-for-project2Now we can access our GitLab repo via SSH without password prompts. You can verify you SSH configuration by running the following command
ssh -T [email protected]You should see a welcome message
Welcome to GitLab, @usernameCloning GitLab repository
We will now clone our GitLab repository to the Server.
First login to your GitLab account and navigate to the relevant project.
Click the clone button and then copy the SSH link under “Clone with SSH”. We will use this link to clone the Repository on our server.
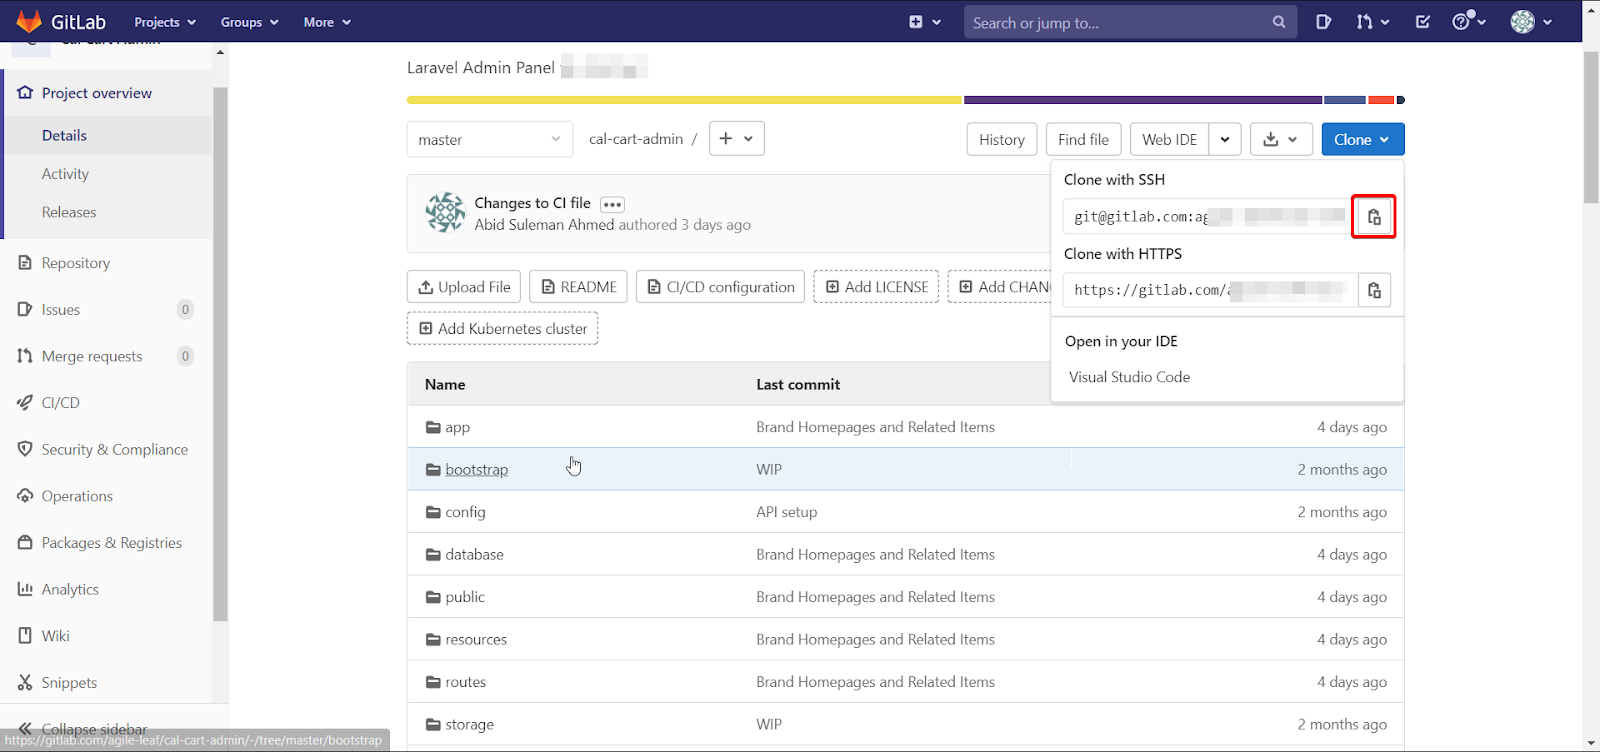
Now login to your Server via SSH and navigate to the web app directory. If you are using Apache2, it will usually be under “/var/www/html/project-folder/”
Note if you are using custom configuration or other server than Apache2, the directory for your web apps will be different.
When in the directory run the below command.
git clone [email protected]:user-name/project.gitWhere you will replace “[email protected]:user-name/project.git” with the link you copied from your project repository.
After the project has been cloned you can run the following command in the project directory to confirm that you have access to the repository and it is pointed correctly.
git ls-remoteIf everything is correctly configured you should see something like this

If you previously cloned the repository using HTTP, you can change it to SSH by running the following commands.
git remote remove origingit remote add origin [email protected]:username/projectpath.gitWhere you will replace the ‘[email protected]:username/projectpath.git‘ with your project SSH link.
In my case, I faced a bizarre problem, when I was updating my remote URL from HTTP to SSH, the commands did not seem to change the git config file and I had to manually change its URL. If you are facing connection and permission issues with your repo, checking this file out might help. You can locate this file in “project_folder/.git/config“
Configuring SSH access to Ubuntu Server from GitLab Repository
To run commands on our server, GitLab needs SSH access. For this article we will be using Shared GitLab runners. For more security and control over runners, you can install a Specific Runner on your own Server as well.
Extra Info: Runners are responsible for executing the commands specified by us upon every new commit. There are several types(executors) of runners available, but we are using the default Docker one. Essentially, as I understand it, whenever a commit is pushed, the runner loads a Docker image, in our case an Alpine Linux distribution and runs the commands specified. All these configs and commands are written in the gitlab-ci.yml file in our project repo, which we will look at in the next section.
Remember the SSH keys we generated in the first step. We will now store that Key(private one) in a GitLab variable. This allows GitLab(runner) to use that key to SSH into our server and run commands.
If you were following the steps and are using Ubuntu server, your private key will be in “~/.ssh/id_rsa” where id_rsa is the private key. Open the key in a text editor and copy its content. The content will be similar to the one shown below.
-----BEGIN OPENSSH PRIVATE KEY-----b3BlbnNzaC1rZXktdjEAAAAABG5vbmUAAAAEbm9uZQAAAAAAAAABAAABlwAAAAdzc2gtcnNhAAAAAwEAAQAAAYEAxwfaXEtDslBEe4uf9kdvFRC9YJW4W6ek6x+tX1iwtJ9LYhitoluDyaMT6NuKlLli/thHA1g6S1t/JkRt3G5tnLNatPWG2JHnRmxU9ydT7kVGEHXdc+CGefoeGw8LXMKQDFVJjkMWwKBJTJDL74aqkvo7bZB8JDybX9QepYrG+1NNDMtyXkL8uRXfQMTZN0p7e/kTzfdKsdasdI/GrEkJr0RVOz2BCtUJPCG+qzjY3lz2yt4jNNoN+ed+FigkTeOpLyJj53N+CSgP8PPLsuqrFyUjAAzo9C+aBfnZVhE2YlBE5eTZ98ej77G7/3mecptWAftngFLudhHdipkeFXtl55XuH5PeN3FhyG+VgHK3Vyt3RBDDquLQeOR8XqUQe0Mu24l0+WP9uCO5viMdqdeYeCtAIGlbFW+3MrkvSOejA2bSpK1xY4XRk670Yq3apXfGcVYGovAOy2+qBRbx8U5HhnnxU8x+p/7DBfPeUJQSAuoEG62PBSO3tPuggBAAAFkFN5d9FTeXfRAAAAB3NzaC1yc2EAAAGBAMcH2lxLQ7JQRHuLn/ZHbxUQvWCVuFunpOsfrV9YsLSfS2IYraJbg8mjE+jbipS5vYtHFTasdfasoahLpoAasdscjhHas+5FRhB13XPghnn6HhsPC1zCkAxVSY5DFsCgSUyQy++GqpL6O22QfCQ8m1/UHqWKxvtTTQzLcl5C/LkV30DE2TdKe3v8085JpsYMRQneAJ8fNvxqxJCa9EVTs9gQrVCTwhvqs42N5c9sreIzTaDfnnfhYoJE3jqS8iY+dzfgkoD/Dzy7LqqxclIwAM6PQvmgX52VYRNmJQROXk2ffHo++xu/95nnKbVgH7Z4BS7nYR3YqZHhV7ZeeV7h+T3jdxYchvlYByt1crd0QQw6ri0HjkfF6lEHtDLtuJdPlj/bgjub4jHanXmHgrQCBpWxVvtzK5L0jnowNm0qStcWOF0ZOu9GKt2qV3xnFWBqLwDstvqgUW8fFOR4Z58VPMfqf+wwXz3lCUEgLqBButjwUjt7T7oIAQAAAAMBAAEAAAGADSZdrP9kB6H6BFejR/hMRI4IlRsPRS78XHSJVeVcN3LW3jJXNoTpXiciJ55pt43QFppfhr8LivMOoY6f25KIN3Q6J/6Y3DI3n5WEv5efmfyFtoyzBvbsq5504sDJtWU9czMnWvjfxfZRIXfnoXm6R1+1EXYcXaCLe3deVv2mS/CjBJdkhQnT/L6PM45N87M+GWEI9XY0SJ2C6jX6wIilb2P2fL9gKDxxg3MGoG5Cwuls14tqhZvemTVeiaR8qdsAM1s1AR/VzUMpIG+MzQEtQzhYvPzJlN0ZfXisYgXus4/AFRYjdAp32xUW1bqEUzvdZe6qdG51c+eb7kEqZf/KsgIX7Ye0dCzQwwXoedywc4bkam14+JFX8r/b9SRJ/XmZNJsoOtH7CV/XI07dsVnVDTgMVI6tnOQFDIZddIn7OCXrlnAKL1453HSKrneI+9mJuyn7gAtfmTk9HU5l4lq0+PUMLoS7a75qpA9vnrrmar7iQuZNiFDxycRTWflsopYBAAAAwQCEuCcJM+NjYw1Fgg3qEboW4ltlu6JUImjWzhPTyYw30IEJCV81KSWxxnsGQ5Ve4Vfxr2B/FOW69/e31IHQIlyDBYnmLjZf42CSmZhCGhbaRBpueebyqfr4ttUspuL5k4kWUcSetQFK9A4WiavOR8B26io8uw7H3PgoA7XBLh/w9SeWLpnaQQgRn6yzRoO1Og3h5JFm78FaO/ZZK9PbiaSuPbh515Bw+G2Q7nYSxs62eCu6Liz6uw0XE0r7tlTPhxIAAADBAOLyfy985rZiaPxdhfg6m1dYiHeGOb0SkE6bXhpSfSlh2HWad5GnYwrJtD/RdnFA99aaA3Un6+V7Og8pVMtI20/+zXLiszYIJG3y+mqQ6hGKLCruhYq4ifmhLvCQeJEJ0Jmo9B/5mSFzHshWR+zodMjSgVK1bDg/oBzQOjYbRRH81keiZNXSI9YHCZpd7+AsP4DZDom5bc79iCdN9fdsYu4xCDYocn5d3NW1B62N3snU2PFUqXzSCOhwbjZrKhQMcQAAAMEA4IJ5vz3WooebFf0BJmOYLHk8h0TYtOHw/4d436PsiN4QT9v2oXta8pv3H4Gd3evde+CyMBWQQyYwWX/QESk/EyGvxPu3RJA6Rp4ZmDPbU3IZ1IvtpTTEbccZA3TjtdApbkX82muPAN2AJiryo2RqgqAzDiqGXlaQiP7LAqCin6TYdQeS9NoH3Y/iUJzRiinJ+d0R9mkX+8uVFMV3xkWXBbe1NJWbeFhmxrCzHuoXHkJD1bumVB/97cXxmaai/TIlaksdISDsflsLkassfnJAaspqwdSKFpdgdhaHAasfJoooASfAsfcd-----END OPENSSH PRIVATE KEY-----Next, we will navigate to our GitLab Repository, Settings ⇾ CI/CD
Then in the variables section we will “Add a variable“.
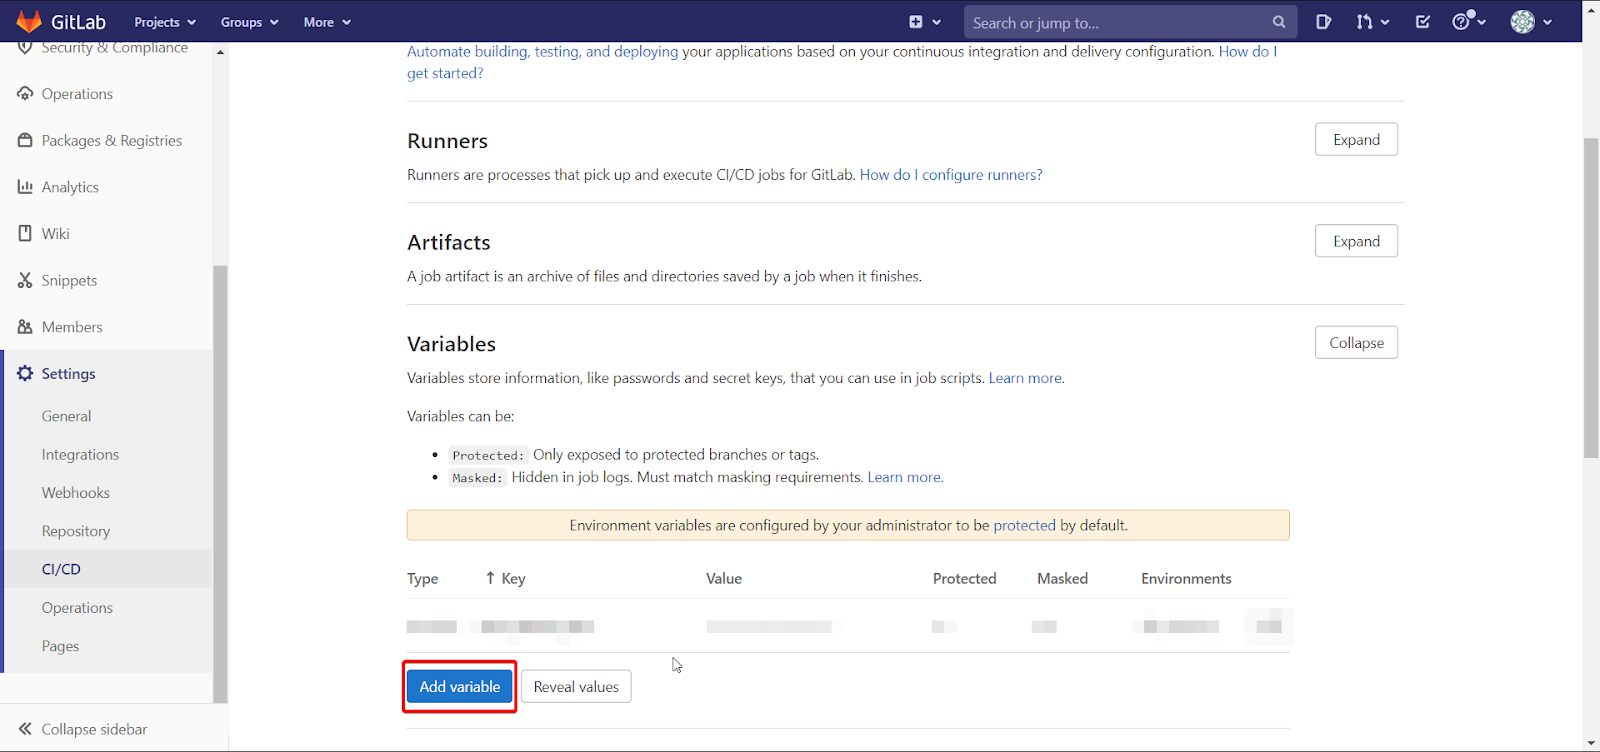
Then in the “Key” field, give a name to the variable. I will be using SSH_PRIVATE_KEY. Remember this variable will be referenced in other files and the Key field will be used.
In the “Value” field, paste the contents of the private SSH key and click the “Add variable” button to save.
Making the gitlab-ci.yml for defining Pipeline for CD
Now that we have set up all the keys and configs, our server and GitLab can communicate with each other. Our gitlab-ci.yml file contains all the instructions for GitLab(runner) on what to do when a new commit is pushed, this is called a Pipeline.
Below is the code for my gitlab-ci.yml file. In short, it deploys Docker with Linux image, installs OpenSSH, adds the SSH_PRIVATE_KEY variable we stored in the previous step, and then connects to our Server to run the commands.
image: alpinestages: - deploymentdeploy: stage: deployment before_script: - apk add openssh-client - eval $(ssh-agent -s) - echo "$SSH_PRIVATE_KEY" | tr -d '\r' | ssh-add - - mkdir -p ~/.ssh - '[[ -f /.dockerenv ]] && echo -e "Host *\n\tStrictHostKeyChecking no\n\n" > ~/.ssh/config' script: - ssh [email protected] "cd ../var/www/html/project-folder && git checkout master && git pull origin master && composer dump-autoload && php artisan migrate && exit" only: - masterNow let’s breakdown the script.
The “image: alpine” is specifying which docker image to use. In our case it is Alpine, which is a very lightweight distribution of Linux.
Next we specify the stages, a way to distribute our pipeline. We can have multiple stages which can be run sequentially or in parallel. We only have one stage of “deployment”.
Now we define what to do in the stages. We first specify what stage it is
deploy:stage: deploymentThen we define what commands to run in before_script and script. Commands under before_script runs before anything else, and here we are installing and configuring SSH Client which will allow our Docker container with Linux to connect to our server.
In script we SSH into our Ubuntu server to run commands. You will have to replace the IP with the IP of your server.
Then we run the following commands
- Go to the project directory
- Specify the branch of our GitLab Repository
- Pull the latest code from Project Repository
- Composer dump-autoload to ensure Laravel finds all new migration files
- Run the migrations to make changes to Database, if any
- Exit
Note that commands 4 & 5 are only applicable to Laravel applications. You can run any Linux commands here specific to your needs because we are using a Ubuntu server. We can also run commands from a file to make our gitlab-ci.yml cleaner.
At the end we specify “only: master” so that the scripts will only run if the current branch is master.
Conclusion
So this is it. Now our GitLab repository and server are connected and every new commit should be automatically deployed to the Server. Our CI file can be modified to run any command on our server.
This is just a basic deployment Pipeline and you can read further in the GitLab documentation for complex scenarios including testing and integration.
GitLab Documentation: https://docs.gitlab.com/ee/README.html
Basics of gitlab-ci.yml: https://about.gitlab.com/blog/2020/12/10/basics-of-gitlab-ci-updated/